jQuery Autocomplete widget for CakePHP 2.2

A JavaScript autocomplete element that links through to your database isn’t built into CakePHP any more – here is a simple solution to add to your application using a jQuery plugin.
Why a plugin? jQuery doesn’t include this functionality, it is provided by jQuery UI but including that library may be a heavyweight solution for your application.

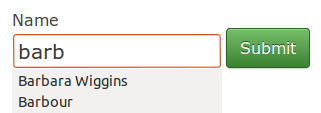
It should end up looking like the image below – as you type, relevant options from your database will appear in the list beneath.

CakePHP autocomplete widget

You can download the jQuery autocomplete plugin from https://github.com/dyve/jquery-autocomplete
Extract the files from the archive and move the .css and .js files from the src folder into the css and js folders of the CakePHP webroot directory.

Link to the CSS and JavaScript in your default layout:

echo $this->Html->css('jquery.autocomplete');
echo $this->Html->script('jquery.autocomplete.min.js');

Add a small form to your View, in this example there is a model called company and we want to use autocomplete on the name field.

Form->create('Company', array('type' => 'post', 'action' => 'find'));
echo $this->Form->input('name');
echo $this->Form->submit();
echo $this->Form->end();
?>

Add this script block to the bottom of the document which activates the plugin and tells it where to submit AJAX requests to:


Modify jQuery.autocomplete.css to look nice with CakePHP default CSS:

.acResults ul li {
	margin: 0px;
	padding: 2px 5px;
	cursor: pointer;
	display: block;
	font: menu;
	overflow: hidden;
	color: #333;
}

Now back to some CakePHP – Your Controller needs a new action which the AJAX requests will be sending data to:

public function find() {
  $this->Company->recursive = -1;
  if ($this->request->is('ajax')) {
    $this->autoRender = false;
    $results = $this->Company->find('all', array(
      'fields' => array('Company.name'),
      //remove the leading '%' if you want to restrict the matches more
      'conditions' => array('Company.name LIKE ' => '%' . $this->request->query['q'] . '%')
    ));
    foreach($results as $result) {
      echo $result['Company']['name'] . "\n";
    }
    
  } else {
  	//if the form wasn't submitted with JavaScript
    //set a session variable with the search term in and redirect to index page
    $this->Session->write('companyName',$this->request->data['Company']['name']);
    $this->redirect(array('action' => 'index'));
  }
}

And finally add some code to the index action in the index action, which handles what happens if the form was submitted via a button press rather than AJAX.

//if there's a session with some data in, add a filter to the search conditions
if ($this->Session->check('companyName')) {
  $name = $this->Session->read('companyName');
  if ($name) {
    $this->paginate['conditions'][] = array('Company.name LIKE' => '%' . $name . '%');
    $this->request->data['Company']['name'] = $name;
  }
}

That’s it.

To to make submit buttons appear alongside form elements
here is a simple bit of jQuery to improve the appearance

$(document).ready(function(){
  $('div.input, div.submit').css({
    'float' : 'left',
    width : '200px',
    clear : 'none'
  });
  $('div.submit').css('margin-top', '14px');
  $('div.input.text').css('margin-top', '-4px');
});

Thanks to the answer on this question from StackOverflow for some inspiration
http://stackoverflow.com/questions/6071828/autocomplete-search-form-cakephp

How to turn CakePHP datetime select element into date and time pickers

This uses CakePHP 2.2.4

The CakePHP FormHelper datetime element is functional but also fairly tedious to use, here is a picture of how it looks.

standard-datetime

With a small amount of effort you can change your view to use date and time pickers that present a much richer experience to your users.

Rich Date Picker:

CakePHP Date Picker

Rich Time Picker:

CakePHP Time Picker

In this example I’m using a model called ‘tasks‘ that contains a field named ‘due‘ of type datetime.
The model, controller and view are all using the default code generated by the ‘bake’ console command.

Third party components – I’ve found two easy to use libraries:

1. Zebra_Datepicker 1.6.2
http://stefangabos.ro/jquery/zebra-datepicker/

2. jQuery timePicker 0.2
https://github.com/perifer/timePicker

Download both of these and extract the files.
Locate the JavaScript files from the downloads and put the following into your CakePHP app/webroot/js:
jquery.timePicker.min.js
zebra_datepicker.js

Locate the CSS files and put the following into CakePHP app/webroot/css:
timePicker.css
zebra_datepicker.css
calendar.png

If you want to move calendar.png into an images folder then make sure you update the URL links in the zebra_datepicker.css file

Link to these in your default layout app/View/Layouts/default.ctp:

//CSS
echo $this->Html->css('zebra_datepicker');
echo $this->Html->css('timePicker');

//JavaScript
echo $this->Html->script('jquery.timePicker.min');
echo $this->Html->script('zebra_datepicker');

Note that you must already have a jQuery script linked to your template, if not the following above the previous 2 lines:

echo $this->Html->script('http://code.jquery.com/jquery.min.js');

In the view file, convert the existing datetime input to text:

echo $this->Form->input('due', array('type' => 'text'));

Now for the JavaScript. I don’t want to disturb what CakePHP is trying to do so firstly I hide the TaskDue element, then add separate text inputs for date and time. Then I activate widgets for each of these elements. Finally I add a submit event to put the values in those widgets back into the CakePHP input element in the format it is expecting.

Here is the code which should be added to the bottom of the document:


You may need to change the timePicker CSS a little to work with the default CakePHP CSS:

div.time-picker {
  position: absolute;
  height: 191px;
  width:200px;
  overflow: auto;
  background: #fff;
  border: 1px solid #aaa;
  z-index: 99;
  margin: 0;
}
div.time-picker-12hours {
  width:200px;
}
div.time-picker ul {
  list-style-type: none;
  margin: 0;
  padding: 0;
}
div.time-picker li {
  cursor: pointer;
  height: 12px;
  padding: 4px 3px;
  color: #000;
}
div.time-picker li.selected {
  background: #0063CE;
  color: #fff;
}

Creating a dynamic listview with jQuery Mobile

This example was written for jQuery Mobile v1.2

A dynamic listview is a widget whose content depends on a previous user interaction with the page. I struggled to find some simple instructions on how to dynamically alter the contents of a listview, the jQuery Mobile documentation for listviews only covers adding items.

The trick I do is to empty and rebuild the list each time the content needs to change.
I could do this completely with JavaScript but instead I store a hidden DOM element because it is easier to get the markup right, then use this like a template to create the list from.

Lets start with some example HTML:


I’ve removed the href destination and added a data attribute to each of the list elements – this would be used if you wanted to do further scripting when one of these was clicked as it’s an easy way of getting the value.

Now for the JavaScript/jQuery. The buildList function does the work, receiving an array with names of the template elements that I want to appear in the list. Remember with jQuery Mobile you don’t use the standard jQuery document ready event – instead bind to the pageinit event. All I’m doing in the pageinit code block is attaching events to the buttons on the page which change the contents of the list, and adding an event when a list item is clicked to show that it is working.

//this function empties the list and rebuilds it
function buildList(cars) {
  $('#carslist').empty();
  jQuery.each(cars, function(k, v) {
    $('#template a[data-val="' + v + '"]').parent().clone(true).appendTo('#carslist');
   //by cloning the elements with 'true' parameter you keep any events associated with them
  });
  $('#carslist').listview('refresh');
}

$(document).bind('pageinit', function() {
  $('#template a').click(function() {
    //do something when a listview element is selected
    console.log($(this).data('val'));
  });

  $('#european').click(function() {
    buildList(['audi','bmw','volkswagen']);
  });

  $('#japanese').click(function() {
    buildList(['acura','lexus','nissan','toyota']);
  });

 //build the initial list with all the options available
  buildList(['acura','audi','bmw','lexus','nissan','toyota','volkswagen']);
});

It looks like this:
jQuery Mobile dynamic listviewYou can find a working dynamic listview example in jsFiddle.

jQuery keyup event firing twice

The jQuery keyup event fires twice in Firefox when Auto Form Fill is enabled, so if you want to make use of this event you either need to switch off autocompletion or add some kind of counter so that the second event is ignored.

I’ve confirmed this with versions 1.7.2 and 1.8.2.

Code to reproduce:

$('#no-auto').keyup(function(e) {console.log('no-auto input detected')});
$('#with-auto').keyup(function(e) {console.log('with-auto input detected')});

This assumes you are running Firebug – if you type a few characters of your email address in the first field, you’ll see 2 lines in the Firebug console for each keypress. Using the second input field you’ll see only 1 line in the console.

You can see an example of the jQuery keyup event firing twice with jsFiddle.

jQuery changing form values not affecting the DOM

With jQuery it is very easy to change the value of a form element, here’s a quick example that changes the text for a form element with id=’input1′

$('#input1').val('this is the new value');

On the page you will see your input change as requested. If you look at the value with jQuery there are no surprises.

console.log($(#input1).val());
//will output 'this is a new value'

However you may be surprised that it hasn’t been changed if you try to look at it with jQuery in a different way. Assuming that input1 is contained in a div with id ‘div1’.

console.log($('#div1').html());

You will see this

The DOM doesn’t look like it has been updated. This certainly wasn’t the behaviour I expected from this so it took a lot of digging to find out what was going on.

It turns out that the HTML value attribute isn’t necessarily the value that is displayed on the page, instead it is known as the default value – used when the page is first loaded or if the form is reset.

The solution. If you want to update the value that appears on the page and the value that’s retrievable by the .html() method is this:

$('#input1').val('this is the new value');
//before jQuery 1.6
$('#input1').attr('defaultValue', 'this is the new value');
//after jQuery 1.5.2
$('#input1').attr('value', 'this is the new value');

Set the ‘defaultValue’ or ‘value’ attribute depending on your version of jQuery as well as using the .val() method. You’ll find that getting the html with jQuery will now show the correct value.